
The icon menu appears on the upper righthand corner of the event. The icons are smaller than the main menu icons, and do not have text beneath them. We recommend adding icon menu items for the networking hub, private messages, announcements, and the attendee briefcase.

1. Select 'Navigation’ on the navigation bar, and scroll down to ‘Icon Menu Items’

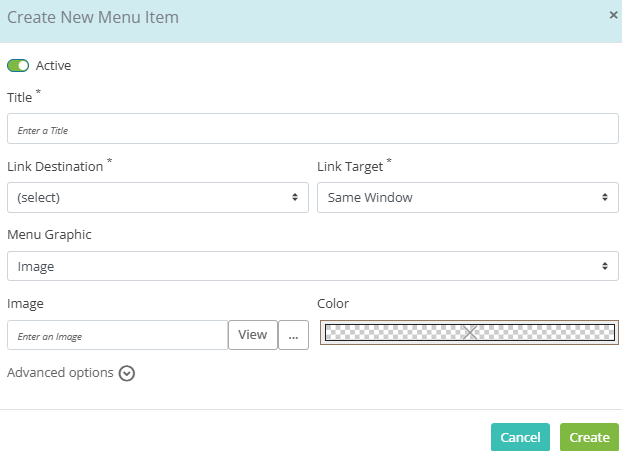
2. To add items, click ‘New Icon Menu Item.’
a. The suggested maximum number of items is 4.
3. Add a Title*, Link Destination*, Link Target*, and select a Menu Graphic (Icon or Image).
Link Destination
a. When selecting a link destination you can add a custom link, select a space, survey, or webcast, or choose from event features like private chat or profile.
Link Target
b. Link target determines how a link opens for the user:
New Window: Opens the selected content in a separate browser window.
Same Window: Loads the link within the current event space, replacing the existing content.
Modal: Displays the content in a pop-up overlay on top of the current view, preventing interaction with other content until it’s closed.
Slide Out: Opens the content in a side panel, allowing attendees to interact with features like private chat, the briefcase, or the networking hub without leaving or disrupting the main event view.
Menu Graphic (Icon or Image)
a. If you selected ‘Icon’ as your Menu Graphic, choose from our library of icons, and select an Icon color.
b. If you selected ‘Image’ as your Menu Graphic, choose an image from the Content Asset Library. When uploading custom images, we recommend using a size of 24px by 24px for optimal display. Please note: when using custom images in your navigation, the Color field will only apply to the menu item text, not the image itself.
4. Advanced Options
If needed, explore advanced options which you can learn more about here.
5. Click 'Create'
6. Scroll to the bottom of the Navigation page and click ‘Save.’ The new icon menu item will appear in the event.